Telemetry in a computer is a very important aspect especially when a user decides to upgrade the version of the operating system. It is responsible for sending the usage and performance data to the selected Microsoft IP stack. The user can extract maximum information from the telemetry report regarding the performance of the system, specifications, mods etc. However, users today are facing a lot of issues with Windows 10. The Windows 10 telemetry causes high disk and CPU usage, thereby leading to degraded performance, unnecessary lagging and slow functioning of the overall system.
Recommended: Vulkan Runtime Libraries
Fix Windows 10 Microsoft Compatibility Telementary High Disk

The telemetry in Windows 10 is basically enabled by default whenever the system encounters changes or when the user wishes to see the telemetry report before going for an upgrade. If the Microsoft Compatibility Telemetry issue causes high disk usage, then there are 2 sure shot ways in which users can fix this problem. These methods have been tested and have yielded fantastic results. The two methods by which this problem can be solved are Group Policy Editor and Register Editor. A very important point to keep in mind while using these methods is that users can use only one method at a time. If the former does not work then they can go ahead with the latter.
Let us now look at these two methods in detail.
Group Policy Editor – A group policy editor is basically a Microsoft management console that provides a flexible single user-interface through which all the settings of the local group objects can be managed, monitored and regulated. Users can also disable computer settings by going to the Local Group Policy Editor control panel. Now, before getting into the solution to fix the problem let us see how to open the Group Policy Management Console. It is a simple process as follows:
- Press down the Windows key + R key. Subsequently, a RUN dialog box will open, a post which the user has to enter the gpmc.msc command in the dialog box and press Enter or click OK to proceed.
- If the first suggestion does not work, then the users can click Start, click on All Programs, then Accessories and finally click on RUN. This will trigger a dialog box which will open shortly after the RUN option is selected. Then the users can type gpmc.msc in the dialog box and press enter or click OK to proceed.
- The Group Policy Management Console should open. Opening the Group Policy Management Console is a very crucial step before attempting to solve the Microsoft Windows Compatibility telemetry high disk usage issue.
Let us now see the steps to solve the Telemetry issue and high disk, CPU Usage using the Group Policy Editor.
Firstly, press down the Windows Key and R at the same time. This will subsequently open a RUN dialog box and invoke the RUN command.
In the dialog box, users will have to type the command gpedit.msc and then press enter or click OK.
The next step is very important. Users will have to go to My Computer, click on computer configuration, followed by administrative templates and then windows components. After clicking on the windows components option, users will have to click on the Data Collection and Preview builds option from the list.
Next, the users can then double click on the Data Collection and Preview Builds option. On doing so, a list of settings will appear in a dialog box. They must then click on the ‘Allow-Telemetry’ option from the list. This will allow telemetry and the user will get an idea as to where the problem is exactly arising from and solve it himself. Finally, he has to select the Disabled option and click OK.
Register Editor–The official Windows Register Editor is basically a tool in Windows that allows authorized users to view the Windows Registry and make necessary changes at their own will. Now some users have no idea about the working of the Register Editor. There are basically 2 ways in which the Register Editor can be opened. Let us look at both those methods below:
Method 1: Users will have to first press down the Windows key and the X key together, and simultaneously choose the command prompt option in the menu by clicking the START button. A command prompt window will then pop up subsequently, following which the users will have to enter the ‘regedit’ command in the window and then press ENTER.
Method 2: Another efficient method that can be followed is to turn it on using the Windows PowerShell. In this method, users will simply have to click the START button, enter the keyword POWER in the dialog box and then click on the Windows PowerShell option in the results. This will turn on the Windows Register Editor (regedit).
Let us now see the steps to solve the Telemetry issue and high disk, CPU Usage using the Register Editor.
- Firstly, users will have to press down the Windows key and the R key together. This will, in turn, invoke the run command and open a run dialog box.
- Users will have to enter the command regedit in the run dialog box and then press ENTER or click OK.
- Shortly after this, the user will be prompted with the User account control pop up, asking for administrative privileges. The user will then have to click on the YES option when prompted.
- Then, the user has to go to HKEY_LOCAL_MACHINE, followed by SOFTWARE option, then policies under which they have to select Microsoft, then Windows and finally the Data Collection option.

- On the right-hand side, the users will have to double-click on the ‘Allow Telemetry’ option. Suppose, the Allow telemetry option is not freely available, it can be manually generated by right clicking on the Data Collection option, clicking on NEW followed by the DWORD (32-bit) value. Once the new value is created, the users can then name it ‘Allow Telemetry’.
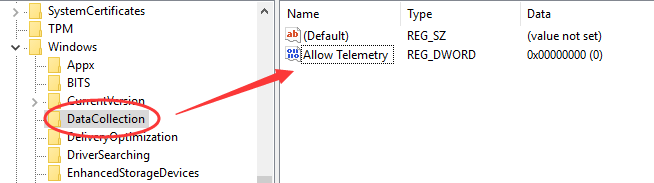

- Users must then set the Value Date to 0 (Zero) and click the OK option. Telemetry will be disabled automatically.

Hope you liked this article on How to Fix Windows 10 Microsoft Compatibility Telementary High Disk Usage. Comment below if you need any help.
1hls ishlamayapti