
Cortana is the digital assistant that is built into Windows 10. It is similar to Apple’s Siri. Well, many Windows users find Cortana very helpful for genuine reasons. It searches the web for you, shows notifications, sets calendar reminders, and does other tasks as well.
But on the other hand, many users have complained that Cortana is using too much memory and CPU. Also, some users have claimed that Cortana is tracking all the computer activity.
Quick Way to Disable Cortana in Windows 10
Before the Windows 10 recent update, you could easily disable Cortana by simply toggling off the switch. But the recent Windows 10 update made it impossible to disable it with a single click. But there is always a workaround in such impossible ways.
If you wish to disable it again you need to just follow the guide in a stepwise manner. So stop Cortana from knowing you by following the methods.
Method 1- Disable Cortana using Registry Editor
Editing or hacking the Windows 10 registry is one such method that will allow you to disable Cortana in Windows 10. But before you make any sort of editing in the registry make sure you have created the backup. If yes, then follow the lead and begin.
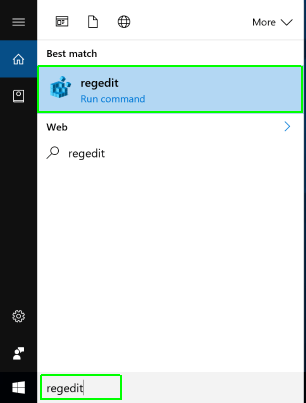
Step 1- Go to the search box on the taskbar. Then open regedit the registry editor.
Step 2- The box will appear with the command. Click on Allow the program to make changes to your computer option.
Step 3- Go to HKEY_LOCAL_MACHINE\SOFTWARE\Policies\Microsoft\Windows\Windows Search.
But here is the trick. You may not find the Windows search. In that case, you need to follow the steps ahead.
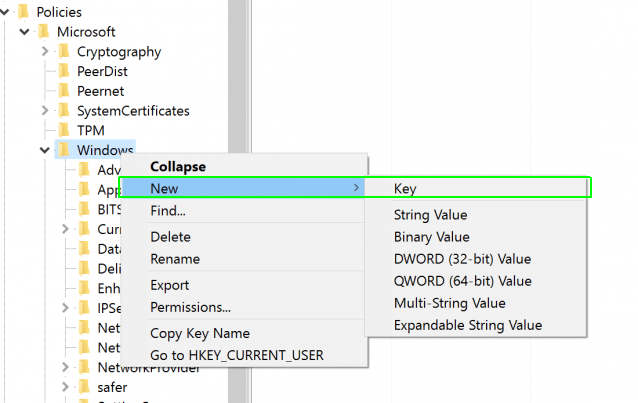
Step 4- Right-click on the Windows folder. Now choose New>Key. Call it “Windows Search.”
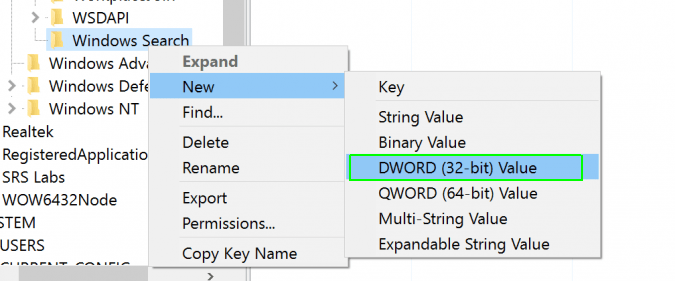
Step 5- Again right-click on “Windows Search“. Then choose New > DWORD (32-bit Value).
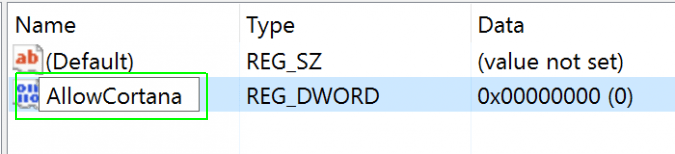
Step 6- Name the DWORD “AllowCortana.” Click on it and make sure that the value set is “0.”
Step 7- Finally restart the computer or you can log out. Then log back in again.
Cortana now will be replaced with a regular search bar. Cortana will not be completed killed or dead. You may find it hiding in the background running programs. But it will no longer be able to save your searches or keep information about you risking your privacy.
Method 2- Stop Cortana from Knowing You
You can also try this method that will disable Cortana to monitor your computer actions. Begin now by following the steps as mentioned.
Step 1- Click on the search box. Or you can click on the Cortana icon next to the Start.
Step 2- Now open Cortana’s settings panel. It will be in the form of the gear icon.
Step 3- In the settings screen now turn every toggle from On to Off.
Step 4- Next scroll to the top of the settings panel. There click on the Change what Cortana knows about me option in the cloud.
Step 5- Microsoft will begin to fetch a page from the Internet. The page will be called Personal Information in the same Start panel.
Step 6- When it loads then scroll to the bottom. Press or hit Clear.
Further, you can also turn off typing and talk feature that Cortana uses to collect data about you. Follow the steps to do so-
Step 1- Click on the Start key.
Step 2- Go to the Settings gear icon.
Step 3- Select Privacy. Then in the left panel, search for Speech, inking & typing.
Step 4- Then click on Stop getting to know me.
This method will also turn off the dictation feature. So follow it as per your requirement.
Recommended: Fix Windows 10 Menu Not Working
Method 3- Disable Cortana on Windows 10 Pro
If you are a user of Windows 10 Pro then you can follow these steps-
Step 1- Press the Start key and search for Edit group policy. Now open it.
Step 2- Navigate to Computer Configuration > Administrative Templates > Windows Components > Search.
Step 3- Now find Allow Cortana option. Then double-click to open it.
Step 4- Click Disabled. Now OK.
Restart your computer and you will see that Cortana is now gone.
Well, this was all about how you can disable Cortana. If you need any help of want to ask any question then comment below.