
We all know about this respective and specific procedure that one can go on reinstalling macOS right on his PC system with the help of internet recovery mode.
However, here you can check out the guide as to how to install macOS from USB! So, let us have a look at the details.
You can proceed with this job by creating and launching a bootable USB drive so that you can finish this installation task.
Instead of using an internet connection, you only need to require a USB for this job.
Below is the complete explanation of this step by step guide:
Choosing a USB Flash Drive for Installing macOS:

The very first is that you have to choose and select a USB flash drive so that you can install this macOS.
Most importantly, you should buy a high-quality USB flash drive so that this process can get completed without any hassle.
It is only these good-quality USB flash drives that do not troubleshoot this installation job of yours and remains to stay away from bug and virus attacks.
Moreover, there is no need to use any kind of cheap and low-quality flash drive.
These cheapest flash drives destroy your operating system and manage to make the transfer speed all and completely painfully slow.
Stay away from using these second-hand and sub-standard USB drivers specifically and especially for this job.
Furthermore, these cheap USB drives may lose your data and there is a chance that your USB port may get damaged.
If you have got 12-inches MacBook, then keep in mind that it should have a single USB-C port.
It is recommended to go on having and choosing a USB 3.0 drive. Those drive needs to be encompassed with a minimum size range of 16 GB.
This is the very step that you have to follow how to install macOS from USB! The details of the rest of the steps are written-below for you that may make this task convenient and quick for you.
Formatting Your USB Flash Drive:
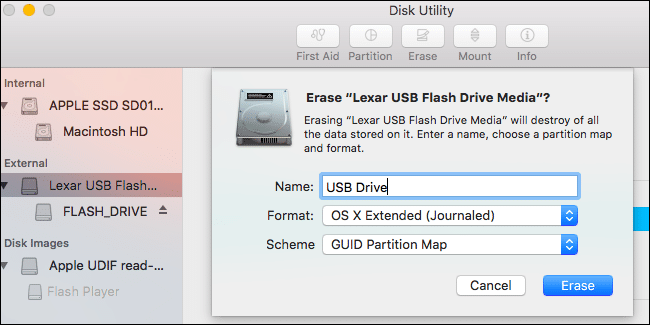
Moving to the second step, it is about properly and completely formatting this USB flash drive of yours.
Like, if you have got a flash drive that is already injected with some data, then you need to format it.
You can make a backup of those important files and folders so that they may not get accidentally erased and removed during this task.
So, for formatting, you have to open finder, go to applications, and access Utilities. In addition, open up the tab of disk utility and start to access your flash drive option.
While formatting, it is best for the user to choose and select Mac OS extended format. Click on the erase button will complete this second step on how to install macOS from USB.
[box title=”” border_width=”3″ border_color=”#02afef” border_style=”dotted” align=”left”]Downloading the macOS Installer:
Moving to other pieces of details on how to install macOS from USB, you need to download this macOS installer of yours.
To download it, what you can do is to open up the App Store and start to search for the respective version of the MAC operating system.
Simply click on the download button.
Creating a Bootable USB Using Terminal:
The next step is to create and launch a bootable USB with the help of a terminal.
Most importantly, the terminal is marked and identified as an easy way if you want to successfully create and seamlessly launch a bootable USB drive.
You only have to replace this My Volume command portion of yours with the desired name that you want to give it to your USB flash drive.
This is how to install macOS from USB!
Now, start to copy and paste the particular command right there in your Terminal window and hit on the button of the Return key.
Besides, as soon as you enter your password details, then make a confirmation that you are erasing this USB drive. You can do that by just typing Y.
Hence, Terminal is going to create and make a bootable version of your USB drive once you complete this step.
The next step on how to install macOS from USB is to create a bootable USB flash drive by using and taking the help of disk maker X.
[/box]Creating a Bootable USB Using DiskMaker X:
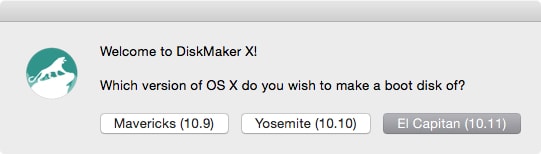
You might be wondering how to use this disk maker X, here we are going to tell you.
This disk maker X comes in the form third-party app category. Moreover, it is designed and made exclusively just to proceed and complete this step.
With the use of this third-party app, you can create this bootable macOS Sub drive version easily.
To follow this step on how to install macOS from USB, go to system preference, access security, and privacy and hit on the option of accessibility.
Furthermore, press the Plus button and start navigating yourself to the Applications folder.
After that, the user has to select and choose Diskmaker X. Once you click on this option, then you are going to see that this third-party app will appear and shown on your list.
The minute this disk maker X is going to be launched, then a prompt message or notification will come in front of you.
You only have to agree to those prompts and notifications. However, if you are creating and launching a single install disk, then press the option of erasing all disk.
The last step on how to install macOS from USB is to give this confirmation that you want to erase and remove everything right from your USB drive.
Booting Your Mac From a USB Drive:
Now, it is time to boot your MAC with the help of a formatted USB drive. This is one of the last finishing steps on how to install macOS from USB.
Firstly, you have to plug you’re created and launched USB flash drive right into an open kind of USP port.
Turn on the system and press the button of Alt as soon the booting process is started.
Furthermore, select and choose your USB drive and you will see that your system is going to boot macOS. If you have a wireless keyboard, then you may encounter issues.
So, what you can do is to plugin and attach a wired keyboard or you can try using a different USB port of yours.
Using Your Bootable macOS USB:

It is right there from the zone of macOS utility screen that you have to perform and carry out this job of installing macOS.
Or you can even access tools like that of Disk utility to perform and precede this job.
Now, you know how to install macOS from USB! You can use this same USB flash drive to upgrade the version of your MAC operating system.
Even more, if you do not feel like troubleshooting your Mac, then it is recommended to make use of a USB drive.
This is a life-saver and suggested method for you!
Conclusion!
This is the complete guide on how to install macOS from USB! If you have already tried out this method, then share your experience with us.
It is by following different methods and approaches that you can install a MAC operating system and here we have just mentioned one specific and particular method with our readers.
More methods and step by step guides on installing macOS are coming sooner, so stay with us.
Our team will make sure that all of your ambiguities and confusions on this installation is solved as soon as possible.
Keep connected with us.