
iTop Screen Recorder makes it easier than ever to record live TV streams. Here, if you want to record live TV streams effortlessly, you can use iTop Screen Recorder, a free screen capture tool, in an intuitive and high-quality way. Whether it’s your favorite TV shows, significant news broadcasts, or memorable highlights clips, iTop Screen Recorder allows recording without a hitch, with support for 4K or 1080p resolution at up to 120fps, for smooth, lag-free playback. You can use the software to record any portion of your screen as well as the audio and webcam input, so it really is fully customizable for all of your recording needs. With the built-in advanced editor, you can even trim, cut, and add effects to make your video high-quality and ready to go. Once you finish your recording, saving it in formats such as MP4 and AVI is easy and sharing is just a click away. So, here is a step-by-step explanation of how to record live TV streams with iTop Screen Recorder in general.
Why Choose iTop Screen Recorder?
Explain the key features that make iTop Screen Recorder stand out. These features include:
- Flexible Recording Options – With iTop Screen Recorder, users can capture their full screen, a particular app window, or a custom-selected area. This adaptability allows users to record exactly what they need and remove any distractions.
- Impeccable video output – The software supports HD and 4K recording with smooth performance and no lag. Whether users are recording live sports, movies, or news broadcasts, they can look forward to clear and sharp visuals without dropped frames.
- Multiple Audio Sources – Users can record system audio, microphone input, or both at the same time. This is great for capturing original TV soundtracks or recording voice commentary as you film.
- Webcam Overlay Support – iTop Screen Recorder justifies webcam overlay for users who prefer a picture-in-picture effect. This is a perfect feature for reaction videos or tutorials and for presentations while recording live TV content.
- Built-in Video editor – After recording, the users can trim, cut, and edit their videos without any extra software. This removes the necessity for extra editing programs or tools, rendering adjustments made after the recording both optimistic and effective.
- Support for Multiple Formats – The videos you record can be saved in MP4, AVI, FLV, etc., making them compatible with different devices and platforms. That fact makes it pretty simple to share recordings or to store them for later viewing.
How to Record Live TV Streams with iTop Screen Recorder
Step 1: Download and install iTop Screen Recorder

Start by downloading iTop Screen Recorder from the official website. Installation process: After downloading the file, install the software as per the instructions on the screen. Open the app to record after installation.
Step 2: Change Recording Options (Webcam, Format, Storage, etc.)
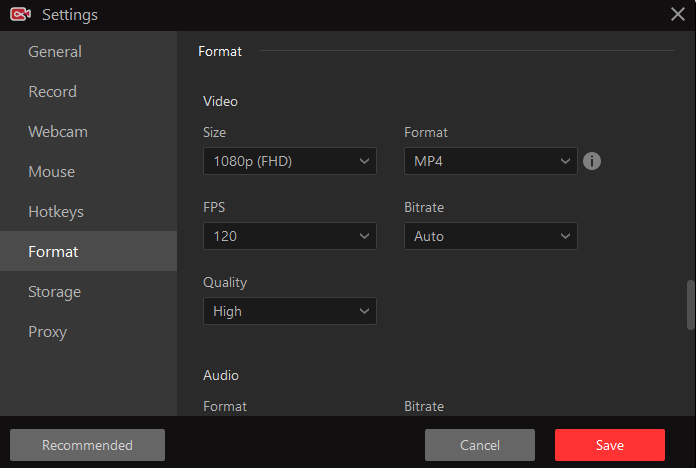
As you get into Recording, set it up to be the best quality in settings. Record, Webcam, and format for high-definition output. Choose the audio source, which can include system audio, microphone, or both. You can even set the output format (MP4, AVI, FLV, etc.) for your favorite playback device.
Step 3: Start and Choose the Records Mode
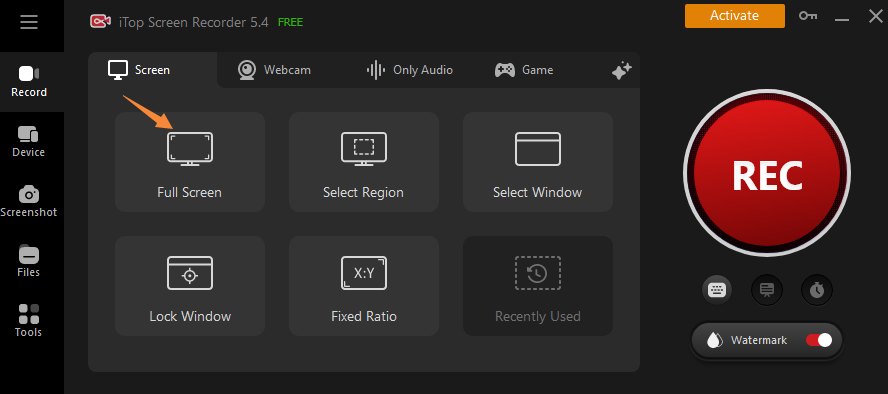
Launch iTop Screen Recorder and select your desired recording mode. Depending on your needs, you can capture the full screen, a specific application window , or a custom-selected area.
Step 4: Begin Recording the Live TV Stream
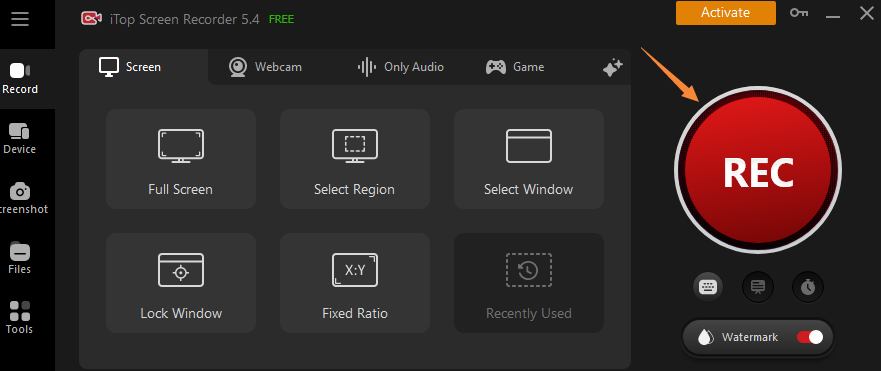
After all settings are done, open the live TV stream you want to record and hit the REC button. The recording will start, and you are free to pause and resume if necessary.
STEP 5: Stop, and Save Your Recording
![]()
When the live TV stream is done, click the red square-shaped button or Ctrl + F9 to stop recording. The video that you have recorded will automatically be saved to the folder that you defined. You may then preview, edit, or share the file as appropriate.
Tips for High-Quality Live TV Recording
To attain a pleasant nice while recording stay TV streams with iTop Screen Recorder, it’s critical to optimize your setup. Start by means of using the best decision available, inclusive of 1080p or 4K, to capture the clearest and maximum specified video. A higher resolution will ensure that the recorded content looks sharp and crisp at all stages in playback.
Additionally, make sure you’ve got a stable net connection to keep away from buffering issues or interruptions that could affect the quality of your recording. A robust and consistent connection will help hold clean streaming with no disruptions.
Finally, to improve performance and prevent lag, unnecessary applications are running in the background. This frees up system assets, allowing iTop Screen Recorder to perform at its first-rate, ensuring wonderful recordings every time.
Conclusion
You can easily and perfectly record live TV streams with iTop Screen Recorder. You’re able to capture video in both 4K and 1080p at 120fps, meaning no lag and no dropped frames for clear and smooth recordings. This tool is super flexible, letting you record any part of your screen along with the audio and webcam input, giving you full control of your recordings. Pulling edits to enhance your videos is easy from the built-in advanced editor, and you can save your content and share it in a selection of formats. Whether you are recording it for fun or for making content, iTop Screen Recorder will make it a durable, professional, easy, and vibrant recording of live TV broadcasts. Experience it for yourself today and effortlessly catch all your favorite live TV moments!