A private IP address can be allocated to any local network device. 192.168.100.1 is a common example of a private IP address that is usually assigned to Huawei, TP-Link, Zyxel, and many other routers. If you have a router or modem with this IP at your place, you should learn about using it to access its admin panel.
From there, you can make a lot of customizations to boost the performance of the network. In this post, I will guide you on how to access the admin interface of routers having 192.168.100.1 as their default IP.

About the IP: 192.168.100.1
Routers and modems have an assigned IP known as their ‘Default Gateway IP’ that you can use to access their admin interface. They use this IP address to connect and communicate with other devices on the network. 192.168.100.1 is a private IP address that you will commonly find on routers from Huawei, NetGear, Arris, Zyxel, TP-Link, etc. If you have a router from any of these brands, you can use this IP to access the admin panel.

Admin Panel is the control center of a router from where you can change or edit default settings, make customizations, and track the statistics. This allows you to bring the best performance out of the router and also keeps the network secure.
If you are a technical person who likes to make tweaks to his devices, the admin interface will unleash a long list of possibilities for you.
What does it do?
The core purpose of an IP address is to establish communication between two devices. The IP of your router allows is to communicate with the devices on the network. At the user’s end, the IP address can be used to sign in to the admin panel of the router. I have already explained what an admin panel is above.

There are a lot of operations you can perform in the admin settings windows. You can change the WiFi user details, change channels, switch encryption protocols, connect or disconnect devices, and do a lot more stuff. It depends on how much you know, and how well you can search about the things you don’t know.
How to know if it is the default IP of your Router?
If you are unsure that if your router is actually using 192.168.100.1 as its default IP, then you can easily check it through the command prompt. Follow these steps to find out the Default Gateway IP of your router:
- Type cmd.exe in the search bar present next to the ”Start” button.
- Right-click on it from the list of results, and choose ‘Run as Administrator.’

- Type ipconfig in the Command Prompt window.
- Press ‘Enter’ on the keyboard.
- Wait for the command to complete.
- You can now see the default IP address right next to the “Default Gateway” option.


That’s it. Another method to find the default IP of your router is going through the user manual or searching it online. Sometimes the routers have a sticker present at the back that also have the key details written.
192.168.100.1 Login
Now that you have verified that your router is using 192.168.100.1 as the default IP, you can use it for admin login. Here is a step-wise guide to log in to the admin panel of your router. Follow the steps mentioned here properly and you’ll be inside the control center.
1. Connect the PC to the Router
The first step is to connect your PC (desktop/laptop) to the router. You can either connect it via an ethernet cable or WiFi. I’d strongly recommend using a wired connection though as it is more stable and dependable.

Wireless connections may sometimes cause connectivity problems. But, if you can’t access the LAN cable, you can continue with the WiFi.
2. Access the Router IP (192.168.100.1) in a Browser
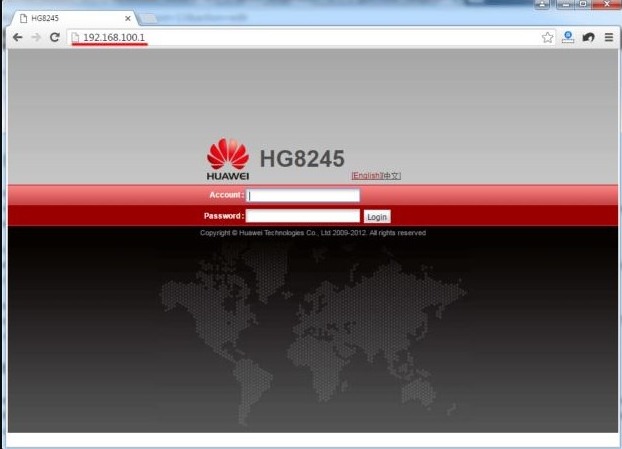
The next step is to open a web browser and check if the internet is doing fine. You can play a YouTube video or browse Facebook to do that. Once sure, open a new tab and enter 192.168.100.1. Or, click on this link.

When the page loads, you will see the router login page on the screen. It has a different view for different brands, but the interface will be similar.
3. Sign in with Router Username & Password
On the router login page, you will see two fields. One for the username, and the other for the password. Now enter the router username and password in the given fields. Remember that you don’t have to enter the WiFi name or password here, as that is a different thing.
If you are unsure about the router username password, you can try entering the default ones. Or, if you forgot the username and password, you will have to reset the router to use the default ones.
Default Router Login Username and Password for 192.168.100.1
Here are the default login username and passwords for routers having 192.168.100.1 as their IP. You can use these to sign-in on the router login page if you haven’t changed them for custom ones.

If you have tried all of these but still can’t log in, try looking for a sticker present on the router or the user manual, and see if you can find the default credentials for your router there. If you find nothing, you might have to reset the router.
How to Reset your Router to Defaults?
When you reset the router, it will become like a new one out of the factory. So, you will also have to do the setup once again. If you don’t know how to do that, you can seek help from someone who has enough knowledge. Or, you can watch some videos on YouTube, or ask me via the comment box.
To reset your router/modem, find, press, and hold the small ‘Reset’ button present at the back or side panel for around 20 seconds. You will have to use a pointed object as it will be present inside a hole. When the router lights start flashing, leave the button, and let the router reboot.
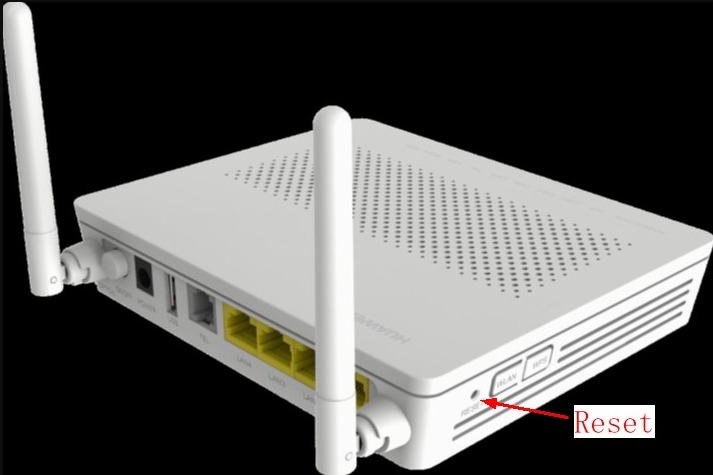
That’s it. You have now reset the router, and you can use the default router login credentials to sign-in on the router login page.
Final Take
192.168.100.1 is a private IP address used by routers from brands like TP-Link, Huawei, NetGear, etc. You can use it to access the admin panel of your modem/router. This is how you can do that. If you need any other help regarding the router admin login procedure, you can ask me using the comment box.
That’s it for this guide. I hope I have helped you enough.